Search This Blog

Radio Guy Tees

Radio Guy Tees
Radio Guy T-Shirts

Saturday 31 December 2016

The VLNA, Oh Boy!

Well,

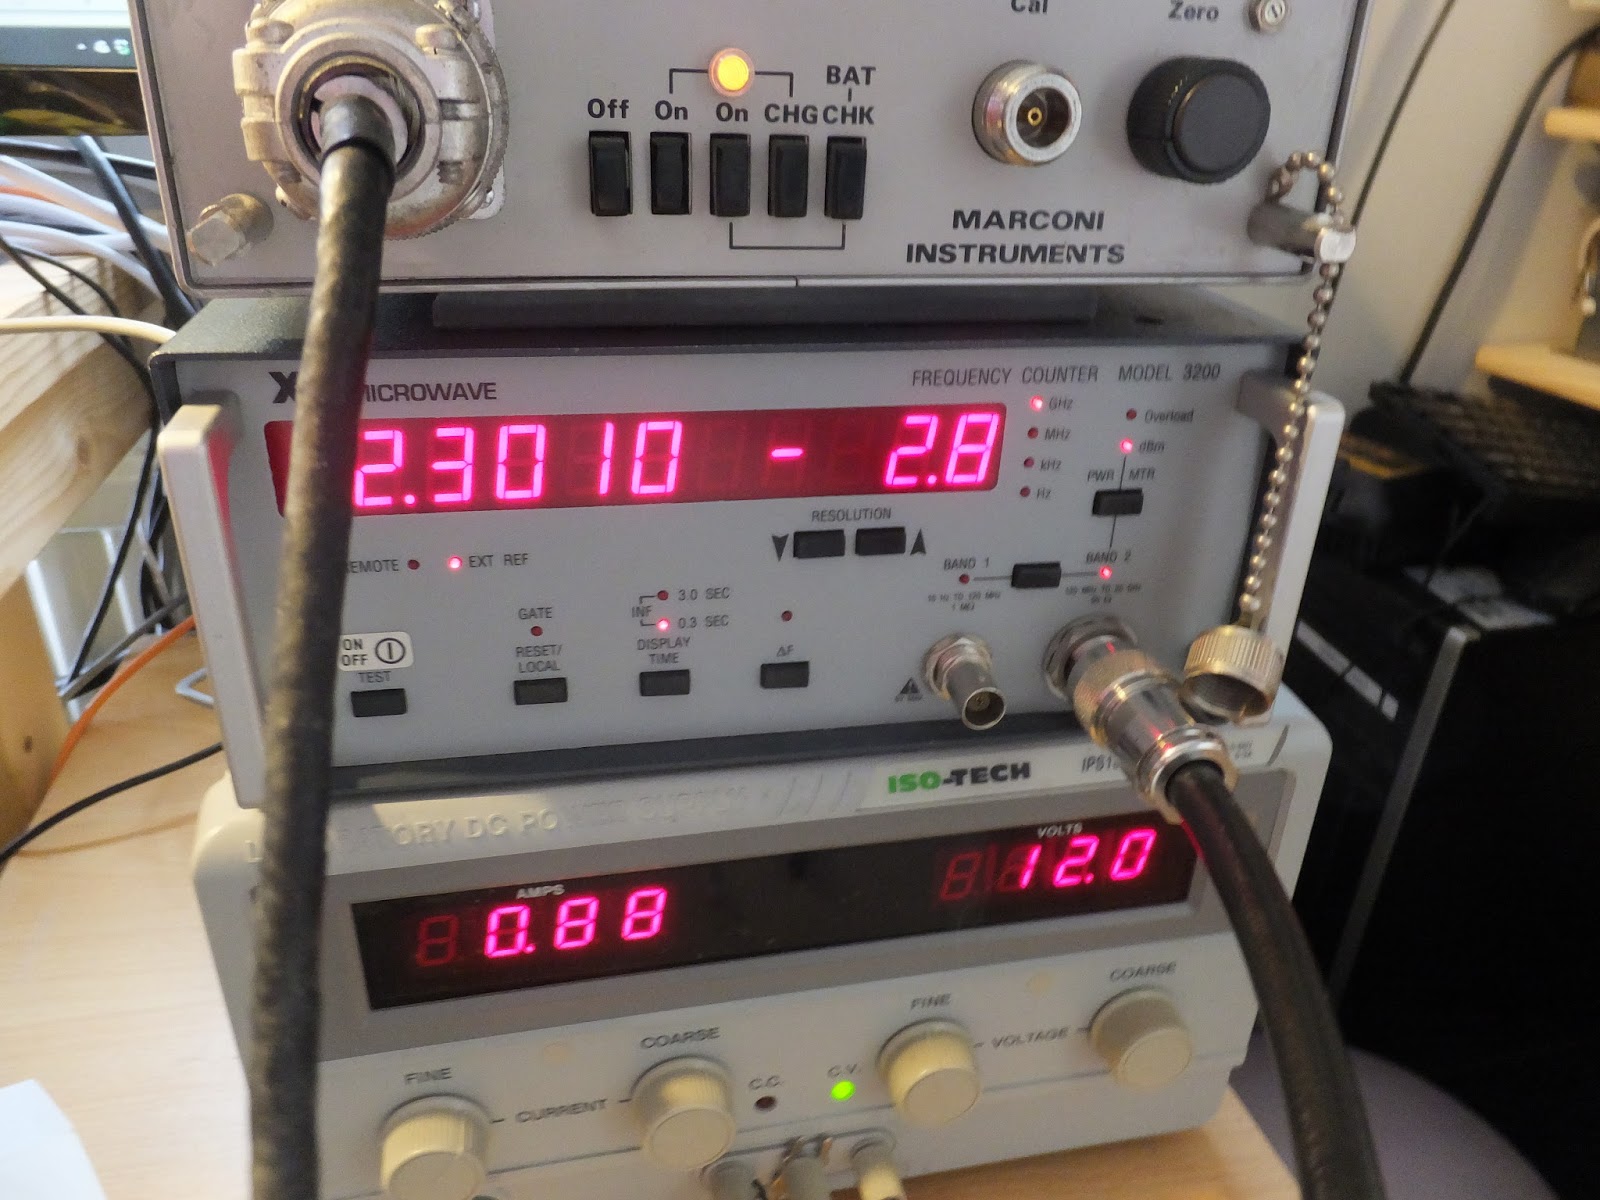
I think I have finished the build of the VLNA for 13cm; having constructed the project I am wishing I had bought a ready built and aligned unit. This was the hardest project to date, mainly because of the very tiny components. I really struggled to get the input matching network parts in place - and have no test gear to actually measure the return loss or noise figures of the final build.

It looks like this:


You can see the input network components in the image above; it kind of looks like the instructions from G4DDK @DXING, but I have no means to actualy measure or test the input return loss.

Lets see.

Friday 30 December 2016

Busy, Isn't it?

Well,

Following my Top Band anteanna from last time, here's a WSPR map:

I find it all rather hard to believe.

Local conditions.

Wednesday 28 December 2016

Top Band (Again)

Well,

A while ago we had some work done in our garden, this resulted in the removal of a 'purglar'; now, this was all fine except it was supporting my top band antenna I made back here.

I've got round to making a replacement for the antenna today, nothing original - it's an end fed sloping, inductively loaded wire.

There's 54 feet of wire, 20 turns on a bit of tumble dryer vent pipe, then 5 feet to the feed point plus an earth rod (well two actually) on the sreen of the coax. Here's the inductor:


and this is the earth arrangement:


Now, I am planning to add several long counterpoise wires, but I haven't done so yet. I connected the antenna to my analyser thingamabob:

or if you prefer return loss:


I've been listening on the WSPR frequency tonight:


It will be a very inefficient antenna and also it has a very narrow bandwidth (like all inductively loaded antennas), but it's clearly hearing signals.

Here's a map after an overnight run:


I also took down the main 4M and 6M antenna today for maintenance, I've put somthing I had at the back of the shed in it's place temporarily, I've also put the 13cm antenna I had lying on my bench in the air:


Here's our two doing what Spaniels do on a beautiful frosty morning earlier today:


Good, egh?

Tuesday 27 December 2016

More Sequencing Secrets

Well,

I've added a FET switch to the sequencer I made last time. The FET switch will provide +12V on RX to the masthead and will be used to switch the masthead relay and also power the VLNA.

The schematic looks like this:


and it's built on the same bit of veroboard as the sequencer:


It switches very quickly, here in blue is the PTT being enabled and in Yellow the power supply that will head up the mast:


So we will then have 200+ ms delay before EVENT 1 from the sequencer:


which will be used for things like turning on the PA bias and enabling RF 'n' stuff like that.

All in all this is coming on nicely.

Local conditions.

Monday 26 December 2016

Sequencing Secrets

Well,

I've been thinking some more about the 13cm project I have on the go, more importantly how I am going to arrange all the bits together.

Firstly we have a 13cm VLNA from G4DDK. I've started the build of this project - this is extreme soldering! the bits are very tiny indeed.

Here's where I am at with the project, unfortunately the last chip cap has made a bid for freedom and is in the carpet somewhere. Here partially built:


and here, almost complete all bar the input components:


Now, I also have the transverter from back here plus a ex telecoms PA that I will start to modify later.

I've started to draw the setup, to save on relays, switching and the associated losses, I will run separate feeds to the antenna (or masthead) for TX and RX. Also, due to the complexities associated with bias-T at these frequencies I will also feed power by cable.

I think it needs to look something like this:


So the thing labelled "gubbins" in the diagram above is actually a sequencer. Having built my 23cm amp back here utilised a ultimate amp control board from W6PQL, that included a sequencer and I had the schematic. So I drew this using non SMD components:


In reality it looks like this once built:


Looking at the top of C1 with a 'scope and grounding the D1 PTT line, we see this:


and as the voltage in C1 rises so the difference between the inverting and non-inverting inputs of the four op-amps swap in sequence as the voltage climbs to the power rail. Here you can see the output state change of the Event 1 op-amp in blue against C1 in yellow:


Event 2 happens later and then event 3 and 4. You can also see that they revert back in the opposite order as the voltage in D1 falls when the ground is removed from D1 and the capacitor discharges through D2 & D3.

Here's the timne delay from PTT to Event 1:


Those in the know tell me that these coax relays can bounce, so a delay of 200ms or more may be needed from thr relay power being initialised to any RF heading that way.


More to come!

Local conditions.

Wednesday 21 December 2016

QRSS Beacon

Well,

Earlier on today I dug out an old QRSS beacon that I made for 30M. I plugged it into my 30M dipole and switched it on.

I've just found this on the internet:


This is from the live grabber belonging to LA5GOA, here I have annotated the image to highlight my callsign in the grabber:


The beacon is running about 6V Peak to Peak which is around 100mW. Clearly I need to turn the power down.

Local conditions.

Measuring 13cm

Well,

Following my previous musings here and the RX tests I have done on the 13cm transverter, I had a bash at testing the TX function today.

I found a frequency counter and RF power meter on my travels recently; Its an XL Microwave counter that measures up to 20GHz.

I've cobbled together a directional coupler from Narda, a Marconi 20dB attenuator plus a further 15dB reduction from another on-line purchased coupler. All in all the frequency measurement point should be about 35dB down from the actual output from the transverter.

It all looks like this:


Using the new meter and counter I am measuring exactly 2301 MHz and a power of -2.8dB:


So assuming my 35dB of attenuation is there or there abouts, that means the output of the transverter is about 32-33dBm which is about 2W - exactly on the money.

My analogue power meter also reads about on the money too:


I've also taken the -30dB forward port from the Narda directional coupler, mixed it with my 900MHz frequency generator as described back here. This has allowed me to see the output from the transverter at 2301 MHz - 900 MHz = 1401 MHz:

All good, egh?

Here's our beautiful Pepper Cat:


Tuesday 13 December 2016

So, your mixing what?

Well,

I mentioned in this post that I needed to find a way to test the TX of my new transverter.

I've bought myself one of these:


It's a mini circuits mixer, that is rated to 2GHz but probably works to a fashion well beyond that. Electrically it looks like this:


So, as a test I have my new USB signal generator set at 2000 MHz connected to the RF port.


The HP Signal Generator from here is connected to the RF port and set to 900 MHz.

Now, given that this mixer should do what mixers do, the IF port should have the sum, the difference and all associated other components and harmonics:


The main point here being that 2000 MHz - 900 MHz = 1100 Mhz, which is clearly visible on the spectrum analyser.

So if I take the output of my 13cm 2.3GHz transverter and do some jiggery pokery with attenuators and then mix it with my 900 MHz sig gen signal I should be able to see it on my spectrum analyser at 1.4 GHz.

That should work, egh?

Sunday 11 December 2016

23cm Tap, Tap, Tap

Well,

The other day on my travels I cam across a TS-2000X. Now, you may recall my declaration of No More! on a recent post. That didn't last long - did it?

Here's the radio:


As it's the X model it includes the 23cm board, the idea now is to add a tap into the IF at 23cm so we can have a panadaptor running on the 23cm band.

So, we take it to bits.....


The 23cm module is underneath this metal plate:


and looks like this....


Now, the buffer amplifier for the IF comes from HUPRF, and looks like this and is stuck to the screening can of the 23cm PA using a sticky pad:


In the image above you can see the input connection in place. The distructions for the board recommend only connecting the screen at the board end; I found a cable from a GPS receiver that fitted the connector so have done it that way.

Here's how I have routed the output coax for the IF tap to outside the radio:


and here seen from the top:


And here you can see where the power is being sourced from - this is about 7.2V on RX (no power on TX). I got in a real pickle with my big fat soldering iron here and you can see flux all over the shop - it's quite a mess:


There's an SDRPlay connected to the output of the tap board.

I've got a PCB log periodic antenna hanging off the front of my recent 30MHz to 4.4GHz signal generator:


So I can now set this to output it's 20dBM at various parts of the 23cm band and see the results on the panadaptor (SDR Radio).  Here we have a nice quiet band with a carrier from my Signal Generator at 1296 exactly:

 
Florrie the Ham Cat has been assisting throughout:


Local conditions.

Thursday 8 December 2016

Counting all the way to 13cm

Well,

You may have realised that I had something in mind when I made the Signal Generator up to 4.4GHz recently? Well, the idea is to use that to test a new transverter I have for 13cm:


This is another most excellent piece of kit from SG Labs. You may remember that the transverter used in this 23cm project came from the same place.

So, this transverter has a number of options for the LO, but with that set to be 1870 MHz, and my new Signal Generator set at 2301 MHz:


Lo, and indeed behold, on 431MHz we see a strong carrier:


Now, this transverter even came with a PCB antenna for 13cm:


So, the next thing is to try and test the TX side; not too sure how I am going to manage that yet, but I am sure I will find a way!

I have an ultra low noise amplifier from G4DDK ready to construct also for this band, plus a surplus telecoms PA block that should give some power. I also seem to have a 13cm Wimo antenna sat on my desk:


So, lots more to follow on this topic!

Local conditions.