Search This Blog

Radio Guy Tees

Radio Guy Tees
Radio Guy T-Shirts

Saturday 19 October 2013

It's JARTS Time!

Well,

Been fiddling today in the JARTS RTTY contest, conditions seem very good and there is still another 24+ hours to go, I thought I would have a look at my log.

I use this log analysis program here:

http://tools.adventureradio.de/analyzer/

So here is today's log as a map:


I was very pleased to work 6Y3M in Jamaica on 40M this morning, that's an all time new one for me. That's another good example of the performance of the Windom I made back here:

http://g0mgx.blogspot.co.uk/2013/08/so-who-is-caroline-ah-carolina-windom.html

I'm going to get some shut eye now and then play some more tomorrow.

Good start though, egh?

** UPDATE **

Here's the map at close of play on day 2:


Most notable addition on day 2 was XV5HS in Vietnam for another all time new one.

Good, egh?

Thursday 17 October 2013

Sometimes I just don't get it

Well,

In order to try and confirm or otherwise my (in) sanity, I have been doing some simple experiments with a L200 voltage regulator.

On the bench right now I have a breadboarded circuit something like this:

As you can see I have stolen this image from elsewhere on the net.

Now, in my build these are the values:


  • R1 is 1K
  • R2 is 100R
  • Vin is 15V
I have three meters hooked up to this circuit, in the image below there is no load connected to the output and the meter on the left is measuring the voltage accross the Rsc or R2 resistor, the meter in the middle is measuring the output voltage at Vout in the image above, and finally the meter on the right is measuring the current drawn from the circuit.


So, I have an output voltage set at 13.8 (using the pot in the schematic) and an output current of 0 (as there is no load) - the voltage drop across Rsc or R2 is 145mV.

Now, given that my Rsc is a rather daft value, I expect the current limiting of the regulator to kick in at:

I limit = 0.45/R = 0.45/100 = 4.5mA

So to pull some current without starting the internal current limiting I have calculated the load needed to draw 2mA from the regulator.

R = V/I = 13.8/0.002 = 6900 ohms

So I now stick a 6.8K resistor across the output terminals:


So now my current draw is as calculated at 2mA ish (it's 1.97mA) but my output voltage has dropped from 13.8 to 13.34 - that's a whopping drop of 0.46 volts.

I thought the whole idea of a voltage regulator was to stop that happening as the load varies?

Confusing, egh?

** UPDATE **

A quick post on the RSGBTech Yahoo! group has allowed others to point out my Muppetry!

Firstly there is an internal current pull from the voltage setting components, so my very low current limit of 4.5mA needs to consider that and didn't.

Secondly the input voltage is probably too close to the desired output voltage to allow the regulator to regulate!

I have increased the input voltage to 18V and decreased Rsc to 10R and the circuit is working as expected.

Good, egh?

Sunday 13 October 2013

Really, Build Three?

Well

Been fiddling some more with the PSU I made for the FT1000MP I acquired back here:

http://g0mgx.blogspot.co.uk/2013/10/another-one-really.html

I've been using some halogen bulbs as test loads for the 13.8V PSU (they are 38W so at 13.8V that's a current pull of 38/13.8 or 2 3/4 Amps. As the FT1000 requires about 2 3/4 Amps for the 13.8V line that seemed just perfect to me!

I wasn't happy with the voltage drop I was seeing in the 723 based regulator under load, I also was far from impressed with the fact that I managed to destroy 2 of these 723 regulator IC's during my testing, I suspect some very suspect ebay sold components!

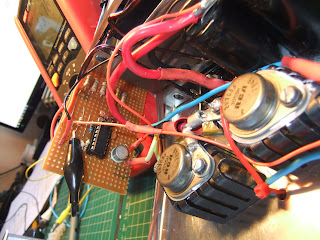
I've remade the regulator board using a L200C regulator I found in my component stock, it's quite a nifty device with similar current protection as the 723. Here's the new board:


Stuck in the same box I put the first one:


I had a very quick play in the RTTY Makrothen contest today, I only worked about 35 stations - mainly as a set up and config test for the JARTS test next weekend which I will be participating in. Here's the obligatory log as a map:


Young Florrie Cat hasn't been helping much:


Fun though, egh?

Thursday 10 October 2013

What a Pickle!

Well,

You will remember the FT-1000MP Mark 5 that I acquired back here:

http://g0mgx.blogspot.co.uk/2013/10/another-one-really.html

I've now built the 13.8V part of the PSU and have tested the receiver. All is not well! Here's the PSU so far:


I ended up using some pass transistors that I found in my junk box; they have been mounted on an old CPU heatsync:


Now, this radio is completely deaf in the main RX but working fine in the SUB RX, I've got it in bits:


What a pickle!

Sunday 6 October 2013

Another one, Really?

Well,

Some of you may remember the radio I bought a while ago on a "definitely no warranty implied, given or otherwise" basis back here:

http://g0mgx.blogspot.co.uk/2013/01/theres-life-in-old-dog.html

Well, that radio ended up with my chum Vince, G0ORC, he has added some filters and uses it from time to time and enjoys the radio very much.

Well, it just so happens that I have found another one, this time rather than the PSU being broken, this one doesn't have a PSU at all! When I brought this home I had no idea if it worked or was a complete pile of junk:


So it's a 2003 FT1000 MP Mark 5 (200W) with a missing PSU! I've connected 13.8V to the appropriate place on the back connector and the radio lights up and makes all the expected noises, I've also had a look inside and it looks very clean and tidy.

To be friends with this radio, I've ordered one of these from ebay to provide me with the 30V rails needed for the PA:


This is 28V rated at 500W, I've also built a 13.8V 5A ish PSU today for the other power requirements of the radio:


This is based on a transformer I found in the clearance pile in Maplin a few years ago for £5. There's a 723 linear regulator feeding a 2N2053 then a pair of 2N3055s:


I'll have to wait for the SMPS from ebay to complete this project, but I'm off back to A71 land next week so hopefully it should be here when I return.

Florrie cat isn't overly impressed and is currently asleep in a US Postal Services box:


Fun, egh?

Friday 4 October 2013

So, lets get a bit smarter

Well,

Been rummaging some more in the shack today and have decided to make a variable attenuator. This is in addition to the fixed attenuators I made here:

http://g0mgx.blogspot.co.uk/2012/11/calibration-complete.html

and the switch attenuator I made more recently here:

http://g0mgx.blogspot.co.uk/2013/09/time-time-time.html

Why? Because I would like to be able to set the output of my newly constructed signal generator from here:

http://g0mgx.blogspot.co.uk/2013/10/so-hows-sig-gen.html

to be exactly 0dBm, how will I be able to set it so accurately? Using the dBm meter I made back here:

http://g0mgx.blogspot.co.uk/2013/01/calibration-finaly-complete-really.html

So, that's the background, here's the variable attenuator:


And now with it attached to a fixed attenuator at the input:


There are two switched input attenuators in this variable thingamabob, lets call them A and B these are then followed by a variable pad to the output port, so, if I connect my new signal generator to the input and my dBm meter to the output I can try and assess what the attenuation of the two fixed pads and also the variable pads are:


and then if I "do the math" and calculate the raw attenuation rather then the power readings:


So it looks like my switch position A is giving me 3.3 dB attenuation and position B is giving me 10.9 (I was aiming for 4 and 10). When combined with the variable pad I am getting 3.3dB to 29dB attenuation in switch position A and 10.9dB to 36dB in switch position B - the fact that the ranges overlap is good enough for me.

Now, for the sake of it I am going  to now look at the return loss of the input and output of this filter, primarily because I am aiming for an impedance of 50R and it will be interesting to see how close to this design goal I have achieved across the HF spectrum.

So, using my return loss bridge from here:

http://g0mgx.blogspot.co.uk/2013/09/so-whats-happened-to-bridge-then.html

I can sweep the HP spectrum and see what the return loss is, firstly lets try the 30dB attenuator I have here:


Now, In the image above, you can see three traces. The purple trace is the normalised return loss of the bridge in a completely unbalanced state i.e. open circuit. The yellow is the return loss with the device under test connected (in my case a port of the 30dB attenuator), and the green is the maths calculated as the delta between the two i.e. the difference between the open bridge and the bridge with the device connected. The table at the bottom then shows the application of the maths to calculate the return loss and VSWR.

So we can see that at 10MHz my 30dB attenuator has a return loss of 33dB which is as close to maximum bananas as makes no odds - thats a VSWR of very close to 1:1. As the frequency increases you can see that the return loss decreases which in turn means that the VSWR increases. At 40MHz the return loss has reduced to 25dB which is a VSWR of 1.1:1. All in all though this attenuator is an excellent match to 50R.

Now, here's the same trace but with the input port of the variable attenuator connected in switch position A:


And now in switch position B:


Interestingly the return loss is flat across the spectrum, but not such a close match to 50R and hence the VSWR is higher. This probably means that the variable attenuator on the output side of the pad is affecting the input impedance and hence the input pad should probably be of a greater attenuation value; the downside of this would be that the device would have a much larger starting attenuation value and therefore not meet my design goal!

Here's the new ham cat Florrie, she seems to be learning from Geddy Cat to assist very well:


Good, egh?

Tuesday 1 October 2013

So, How's the sig gen?

Well,

You may recall the bench Signal Generator that I started here:

http://g0mgx.blogspot.co.uk/2013/09/bench-sig-gen-any-bright-ideas.html

I also stated that I would try and find a case for the project at the HamFest; well I came home with something but it's just not quite right.... anyhow, I've found an old plastic case with a missing front (soon to be rear) panel. Here's what I've done with it:


So I've made a lash up power supply and stuck it in a box. Not made such a bad job of the rectangular cut-out needed for the display:


I need to try and find some kind of plastic see-through something or other to go in front of the readout, I also really should screen the RF parts of the circuit. I figured I could do that with more of the copper boards I have used to construct the electronics on.

The output is nice and clean:


And whilst not perfect by any means, the harmonic content is very minimal:


Geddy Cat is very pleased that I am home, he isn't allowed in the shack when I am away and his favourite sleeping spot is currently on top of the printer. He doesn't help much:


He is, however, the best cat in the world.