Search This Blog

Radio Guy Tees

Radio Guy Tees
Radio Guy T-Shirts

Friday, 31 January 2014

JBoT - A linear for Minima

Well,

In an attempt to finish up my Minima tranciever, I have today been making the linear amplifier to follow the gubbins we have so far.

The Author has used this:

http://www.hfsignals.org/index.php/File:Qrp-linear.png

and I saw no reason not to follow suit.

Here's what the linear looks like right now:


Mine is built with 2N3053s (because I had some). I had a spot of bother getting the correct output from T2, this should produce 2 equal amplitude but out of phase signals. I eventually managed to make something that seemed to work, the output of T2 looks like this:


and the output of the final transformer after the 4 finals looks like this into a dummy load:


So, I make 56V peak to peak about 7.8 watts, so I suspect I am driving the amplifier a bit hard with my sig gen and attenuator set up. I also think I have a bit of a tendency for the finals to oscillate.

So, we will have to see. The next bit I need to do is understand the band selection outputs from the Minima software - I am sure these are designed to allow me to switch LPFs after the linear, which I need to do as the linear will have to be followed by suitable filters to remove any harmonic content.

Good progress though, egh?  

Thursday, 30 January 2014

Minima - Remaking the 15MHz LPF

Well,

Now that I have some life in my Minima, I need to remake the 15MHz Low Pass Filer. You may remember the sweep I did originally:


There is a bit too much attenuation at the 14-15MHz frequency range - this will result in a very deaf radio on the 20M band!

So I used the QUCS tool to design an 11th Order filter with a cut off at 15MHz, I then changed the capacitor values to "real world" numbers and ended up with this:

I then made the filter and after winding each toroid I measured the value and carefully spaced the turns to get as close to the required value as I could.

The physical construction looks like this - all the toroids are T50-6s:


and when I sweep the filter on the Spectrum Analyser I see this:


So this looks much more like what we need - I will use this and replace the one in the radio right now.

Good, egh?

My Minima is Alive and Well!

Well,

Following a quick trip to Stockholm, I have resumed my building and testing of my Minima transceiver. I like to take things in a kind of build a bit, test a bit way and have been stepping through the RX and checking as I go.

I didn't actually find anything amiss, so I connected a wire antenna and tuned down to the 40M band.

Here's a quick video of some of the things I heard:


Just fantastic, egh?


Sunday, 26 January 2014

And at that point - it ground to a halt!

Well,

Here's how my Minima is looking on the bench right now:


I've left just enough room between the front mounted processor and associated parts and the boards on the base to fit a vertical RF screen if I find I need it:


And here is the back of the case with a reset switch, DC inlet, antenna socket and connector for the USB serial adaptor to connect.


Unfortunately I have to return to working for a living tomorrow and that means Stockholm this week, so progress will now have to halt for a while.

I hope to have enough room on the base of the case to the rear for the PA and also the right hand wall will be used for the output filters. I have made the RS232 interface and that's on the back wall of the case.

I will finish this when I return....

Watch this space.

Minima Processor Board

Well,

Following on from my case building yesterday, I have been assembling a board to contain the processor and associated components. I have simply made this using stripboard so that it will mount on the back of the LCD display:


And this board fits inside the front panel like this:


I included a 5V regulator on the board and also a LM317 to regulate the 5V down to 3V3 for the 570 which I am proposing to mount on a small copper board next to the 1/4" jack socket. I also now need to build the RS232 interface as I am definitely going to want to be able to reprogram the processor without removing it from the socket.

Good, egh? 

Saturday, 25 January 2014

Boxing to the Minima

Well,

Now that I have the beginnings of a working project, I need to start to think about how I am going to box the resultant transceiver. So today, to add to the mess on  my bench, I have created a box out of sheet aluminium and the front panel is loaded with the LCD, volume (with on/off switch), mic and headphone socket, the tuning control plus the function push button:


So the back of the front panel (if you get my drift) looks like this:


I have decided not to include the reset switch on the front panel as I will possibly mount that on the back, although I think power off and then on will have much the same effect!

I am thinking that the main board with the majority of the gubbins will fit on the bottom of the box, the LPFs and crystal filter plus KISS mixer on the rear panel vertically and I hope that will leave enough space for a PA plus some band pass filters.

The next job will be to mount the microprocessor and the 570 to the rear of the front panel - perhaps I will make something out of stripboard for the processor and mount it on the holes in the LCD.

We shall see.

Our two latest additions Elmo and Darley have been playing "who can run round the garden the fastest" today and are now just about fit to drop:


All good, egh?

Friday, 24 January 2014

Minima - Full Circuit TX - Take II

Well,

Following on from my last post, having looked at this spectrum plot:


We needed to understand what the RF peaks on the left were; there seems to be one at 5.something MHz and another at 8.something.

The first thing I did was throw the cable I was using to connect the audio generator to the mic amp in the bin - it was clearly a pile of dingos kidneys. I then connected the audio sig gen to the 'scope and set it for about 40mV peak to peak at 1.2 (ish) KHz.

I then repeated the sweep above:


So, this tells us a few things - primarily that these RF peaks are related to the audio and the drive level - I was probably overdriving the audio amp in the earlier scan.

Now, if I then focus in on the peak we can still see at 5.something MHz and exaggerate the problem by increasing the audio drive I see this:


Now, these multiple peaks look very suspiciously like they are spaced by the audio frequency to me, so I increased the audio sig gen frequency to 3.5KHz:


I can reduce the amplitude of these peaks by setting the balance pot on the bias for the KISS mixer - but this is about as low as they will go.

This will all mean something to those far cleverer than I, but I actually suspect that there isn't really a problem as long as the audio levels are sensible.

What do you recon, fun, egh?

Minima - Full Circuit TX

Well,

I finally got all the bits n bobs together and was able to try the full circuit TX. There's something odd going on with my PTT as the software is going into TX mode without me grounding the Arduino digital pin 3, but the relay isn't changing over until I do so. Anyhow, here the bench (read complete mess) right now:


I've tried to annotate the image above and label the various bits and pieces to help understand the mess.

Here's the output of the LPF on the SA:


This is at the switch on frequency of 14.200MHz. I'm just injecting an audio signal into the mic socket (well, there isn't a socket - just a capacitor lead!) but it looks quite clean and sounds fine on my bench RX.

It's time to fiddle as my LPFs aren't switching when the frequency increases and there are some other odd things going on, but that will be down to my Muppetry I am sure.

Good start though, egh?

Thursday, 23 January 2014

Minima Arduino si570 Interfacing

Well,

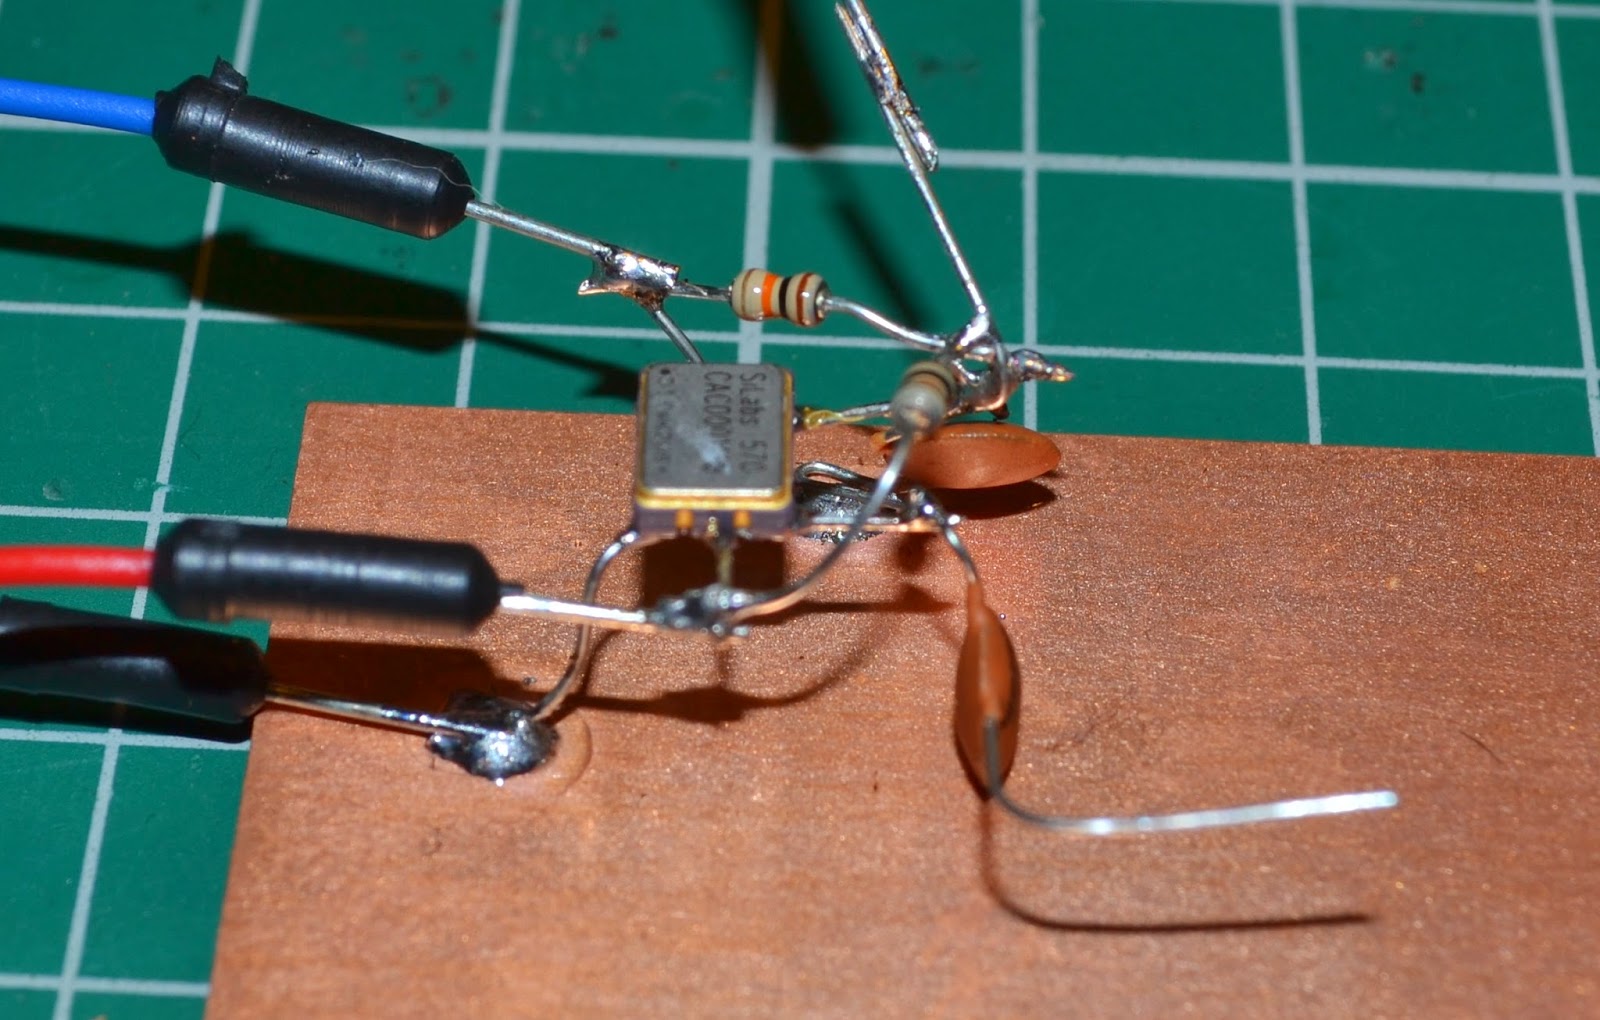
Been fiddling a bit more this evening and have interfaced the si570 silicon labs device:

http://www.silabs.com/Support%20Documents/TechnicalDocs/si570.pdf

Now, I haven't ever used one of these before, but I happened to have one here. I verified that it was a CMOS 3.3V variant (there are lots of different types) and then thought about how to connect to the thing - it's very, very small.

So, the first thing I did was find some off cuts from resistors on my bench and solder them to the device which I held in place with some trusty blue tac:


I then assembled the pull-up resistors and the coupling caps on a bit of copper board:


NOW THIS BIT IS VERY IMPORTANT because the si570 is a 3.3V device I have had to modify the file TWI.c to remove software 5V pull-ups on the two interface lines, as I am using a Mega2560 board I HAVE HAD TO PHYSICALLY REMOVE ON BOARD PULL UP RESISTORS also. I have documented the details of the mod on the Minima Wiki here:

http://www.hfsignals.org/index.php/Radiono

If you don't do this then I suspect the 5V pull ups will result in bye bye si570.

So, I connected it up to the Mega2560 and connected a 50R terminated 'scope to the capacitor leg you can see in the image above, this is with the scope bandwidth limit enabled:


Here, with a x10 probe and no 50R termination:


here, with a x1 probe and no 50R termination:


and here with a x1 probe and a 50R termination:


here's the signal on the Spectrum Analyser:


And here, for comparison, is a 34MHz signal out of an AD9851 Arduino controlled DDS I made back here:

http://g0mgx.blogspot.co.uk/2012/02/dds-running-well.html

and it looks like this:


CW Cat hasn't been helping much today:


Good though, egh?

Wednesday, 22 January 2014

Minima Carrier Adjustment

Well,

Been fiddling a little more this morning, and have dug out an Arduino Mega2560 board - this doesn't contain the processor utilised in the Minima but Arduino allows you to compile for the target board that you have so I am going to use this for the time being.

The first thing I did was to attached a 16x2 LCD display and test that it was working OK using a very simple piece of code that uses the same pin assignments as the Minima software:


The only change I made to the Minima LCD wiring was to include a 10R resistor in the +ve line to the display backlight (LCD pin 15).

But once I was confident I would be able to "see" if the Minima code was running I compiled and loaded that into the Mega2560 board, and hey presto:


So I know that the software has loaded and is running OK, I can now convert the pin assignments from the target processor to my Mega2560 board and wire up the various external bits and pieces. There is also a 3.3V line I can hook into on the board to power the Si570 thingamabob.

I then thought I would take a look at the BFO and carrier adjustment - more as an initial experiment with my Spectrum Analyser to see if I could do what I thought I could do....

So, the first thing I did was do a sweep of the crystal filter using the tracking generator (as previously), then I froze that trace (which appears in purple below) and coupled up the crystal filter into the circuit. I then adjusted the USB BFO so that the carrier appears just down the left hand side (because I want to maintain the Upper Sideband which is higher in frequency) of the crystal filter skirt:


Now, I am pushing the capabilities of the instrument a little as the bandwidth is at it's absolute limit, however, you can clearly see the carrier inside the crystal filter and inside the left hand side slope. If I now add an audio signal into the mic amplifier, you can see that the upper sideband is now well within the passband of the filter, and will be from about 300Hz up to about 3000Hz, the lower sideband doesn't feature as that has been supressed by the filter as it is as far to the left of the carrier as the USB is to the right:


It does look like the instrument is struggling with bandwidth a little and I **think** that's why there is a pile of stuff between the carrier and the USB, but visually you can really see what's going on - which is great!

So, for the LSB BFO setting, I need to do the same thing but putting the carrier on the right hand side of the crystal filter skirt so that we maintain the Lower Sideband and then I suspect Bob will indeed be my Uncle.

Interesting, egh?

** UPDATE **

NOTE: Because the second mixer mixes with a Local Oscillator that is HIGHER than IF, the sidebands become inverted. If we start with a 20MHz BFO with a 1KHz audio frequency the output of the 1st mixer will have the USB at 20.001 and the LSB at 19.999. Once this is then mixed for a second time with the LO at 34MHz we will have the previous USB at 20.001 moved to 34-20.001 = 13.999 and the previous LSB at 19.999 will now be at 34-19.999 = 14.001. The sidebands have swapped places!!!!

So the carrier adjustment above needs to be the other way round and the illustration above showing the USB above the carrier will be the LSB after the final mixer stage.

I definitely need to get out more.....

So here are my final adjustments (I hope), I have stored the sweep of the Crystal Filter, this time in yellow in the images below; also in each image the marker is on the carrier and the frequency displayed.

This is the image with the relay engaged so we will eventually have LSB out of the TX:


and here with the relay disengaged so we will eventually have USB out of the TX,, here the adjustment has pushed the carrier to its maximum available frequency which is not quite high enough as ideally the carrier needs to be further down the right hand filter skirt:


and here I've labelled the various bits and bobs:


Tuesday, 21 January 2014

Minima Bidirectional Amplifier

Well,

Progress on this Minima is going well, I've now built the bi-directional amplifier section. If you look at the schematic here:

http://www.phonestack.com/farhan/minima.html

It's the bit containing Q6, Q7 and Q8 in transmit and Q3, Q4 and Q5 in receive.

The TX amp is giving me about 18.5dB of gain:


Above the yellow in the input and the blue is the output. both 'scope channels are terminated in 50R.

And here is the RX amp which comprises a common base amp plus an impedance transformation, this is Q3, Q4 and Q5:


As above the yellow in the input and the blue is the output. both 'scope channels are terminated in 50R. I have also added a step attenuator to the output of my signal generator to reduce the level of the signals as they will be very small in the RX sections.

The RX amp is giving me about 14dB gain:

Here's what my two boards are looking like now:


I'll try and label the photo above once the audio sections are complete but anyone looking closely needs to be aware that my RF transistors are MPSH10s.

I've also built the PTT circuit and that is a little confusing to simpletons like me. The base of Q23 is held HIGH in software whilst in SSB mode and then forced low in software in CW mode. If you build the circuit without that understanding you will find that the relay energises into TX without any external circuitry connected. Here's what the author said about it:

We were running out of pins. we should have had a separate PTT input and another T/R line as an output. But I had to make do with a single line.  This is quite confusing and i had to keep reminding myself of the plan.  the plan is like this:

  1. In SSB mode, the PTT line is in input mode. it has an internal 10K resistor pulling it up. The ptt switch provides the high/low switching.
  2. In CW mode, the PTT line is put into output mode and pulled down, putting the transceiver into transmit mode. Then, after a delay to let the relays settle, the sidetone is keyed. 

I now have to move on to the CW sidetone generator, and the audio pre and power amps. Once I have done that I can start to build the processor/LO and LCD display sections. They will need to be separate boards to keep all the LCD and processor hash away from the RF sections - I'm currently thinking I will use stripboard for that.

I won't be including the COM port on mine as I will program the processor in my Uno board and then just pull it out and stick it in the Minima. I suspect once I start tinkering with the software I will want to be able to program in-stitu, but that can come later.

I'll keep you posted.

Sunday, 19 January 2014

Minima BFO

Well,

Having brought home two piles of trouble this morning (they are solid Cocker Spaniels):


I suspect play time may be somewhat restricted for a while, but anyway, during a dog nap this afternoon I have built the BFO for the Minima. This uses a relay to switch between two trimmers which need to be adjusted for LSB and USB carriers. My build looks like this:


The output looks like this on the 'scope:


and this on the Spectrum Analyser:


I've also built the microphone amplifier and coupled it up to the post BFO mixer. This is a simple 2 diode arrangement with no adjustment for carrier suppression - this is dependent on good matched diodes. I matched a pair of 1N4148s and this is what I see with a 1500KHz audio injected into the mic input:


The signal in the centre is the BFO, so it's at least 40dB down on the audio - the peak to the right of the carrier or BFO is the USB and the peak to the left the LSB. The mixer has done what mixers do and we have the BFO plus the audio frequency and the BFO minus the audio frequency.

All good....