Well,
Over the past few months or so I have been playing with kits from QRP Labs based on the genius of Mr Hans Summers.
I was using the VFO I made back here to clock my newly built Signal Generator from here and found some rather odd behaviour.
When I investigated this I found that the VFO output switched off every second:
I posted on the QRP Labs forum and very soon had a reply telling me this was an issue that had been fixed in a later version of the firmware.
So now I needed to re-program the AVR processor using the hax file available - I hadnt done this before.
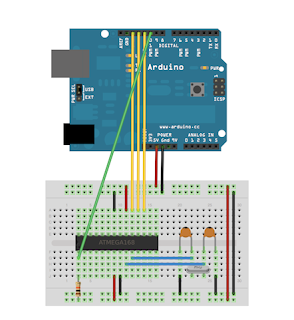
So, here you will find that you can use an Arduino as an AVR Programmer - now I have lots of those. On the Arduino site you can see how to configure the processor on a breadboard:
I added a 7805 regulator and powered the breadboard contents from my local bench PSU. I connected the grounds together of the Arduino and breadboard, but not the power lines! So the Arduino is powered from the USB cable and the breadboard separately.
So assuming you already have an Arduino IDE installed and working here are the steps:
Here is our very beautiful Miss Luna Cat who has been with us since July 2015, and is now, finally, letting me stroke her. She is asleep in the shack on the bag that came with my recently acquired frequency counter:
Local conditions
Over the past few months or so I have been playing with kits from QRP Labs based on the genius of Mr Hans Summers.
I was using the VFO I made back here to clock my newly built Signal Generator from here and found some rather odd behaviour.
When I investigated this I found that the VFO output switched off every second:
I posted on the QRP Labs forum and very soon had a reply telling me this was an issue that had been fixed in a later version of the firmware.
So now I needed to re-program the AVR processor using the hax file available - I hadnt done this before.
So, here you will find that you can use an Arduino as an AVR Programmer - now I have lots of those. On the Arduino site you can see how to configure the processor on a breadboard:
I added a 7805 regulator and powered the breadboard contents from my local bench PSU. I connected the grounds together of the Arduino and breadboard, but not the power lines! So the Arduino is powered from the USB cable and the breadboard separately.
So assuming you already have an Arduino IDE installed and working here are the steps:
- Start Arduino IDE and load the ArduinoISP sketch and upload to your Arduino (the sketch is in the examples folder and my board is an Uno)
- Wire the Arduino board as the above diagram - I used a 20MHz crystal and 2 22p capacitors
- Download avrdude from here (I put my download into a local directory C:\Users\Mark\Downloads\QRP VFO)
- Download the hex file you want to program from the QRPLabs forum files area
- Open a command window in Windows (type cmd in the search box)
- execute the command "cd C:\Users\Mark\Downloads\QRP VFO" (replace my target with your local directory)
- then we need two AVRDude commands (replace COM13 with your Arduino COM port):
- To set the fuses: avrdude -P COM13 -b 19200 -c arduino -p m328 -v -e -U efuse:w:0x04:m -U hfuse:w:0xDF:m -U lfuse:w:0xF7:m328
- To program the flash: avrdude -P COM13 -b 19200 -c arduino -p m328 -v -e -U flash:w:VFO.s1.02c.hex (replace with your hex file)
Here is our very beautiful Miss Luna Cat who has been with us since July 2015, and is now, finally, letting me stroke her. She is asleep in the shack on the bag that came with my recently acquired frequency counter:
Local conditions


No comments:
Post a Comment